In the last five articles I’ve been doing a study of what it takes to do a node app. For those who are starting here, I had a list of requirements:
- I need to be able to run a small web server
- I need to be able to handle templated views with server-side code
- I need to be able to do social authentication
- I need to be able to use an MVC architecture
- I need to be able to provide a Web API
- I need to be able to publish a node app to Azure
- I need to be able to edit node applications in Visual Studio 2015
Today is all about publishing my project to an Azure Website. I’ve actually got a reasonable web application already. It is an MVC structure, has a Web API and is authenticated through one of a number of services thanks to a plug-in from Auth0.
There is a great article on publishing to Azure already. Unfortunately, it relies on you starting from scratch. I’ve already got a directory full of stuff, so how shall I publish something that I already have?
Step 0: Install Azure PowerShell
This step is a one-off. Microsoft has created a set of PowerShell cmdlets specifically for Azure. It’s a Web PI installer. Just go get it and install it.
Step 1: Define the Cloud Service
The first step is to define a cloud service. Microsoft would have you run New-AzureServiceProject, which is ok, but requires that you specify a directory that doesn’t exist. My project exists already. Fortunately, the New-AzureServiceProject cmdlet does nothing more than create four basically empty XML files. You can use New-AzureServiceProject emptyapp to create the empty files, then edit them.
In basic-webapp, I’ve created the four files. The first two are copies of one another: ServiceConfiguration.Cloud.cscfg and ServiceConfiguration.Local.cscfg:
<?xml version="1.0" encoding="utf-8"?>
<ServiceConfiguration xmlns:xsd="http://www.w3.org/2001/XMLSchema" xmlns:xsi="http://www.w3.org/2001/XMLSchema-instance" serviceName="basic-webapp" osFamily="2" osVersion="*" xmlns="http://schemas.microsoft.com/ServiceHosting/2008/10/ServiceConfiguration" />
The ServiceDefinition.csdef file is similar – just different XML tags:
<?xml version="1.0" encoding="utf-8"?>
<ServiceDefinition xmlns:xsd="http://www.w3.org/2001/XMLSchema" xmlns:xsi="http://www.w3.org/2001/XMLSchema-instance" name="basic-webapp" xmlns="http://schemas.microsoft.com/ServiceHosting/2008/10/ServiceDefinition" />
Note that the New-AzureServiceProject cmdlet generates UTF-16 files. I find UTF-8 files easier to edit, especially in Atom, which is what I am using right now. I just altered the encoding in the xml header to be utf-8 instead of utf-16 when I was cutting and pasting.
Finally, the deploymentSettings.json is the same for all projects at this stage. You can just cut and paste it in:
{"Slot":"","Location":"","Subscription":"","StorageServiceName":"","AffinityGroup":""}
Once I have initialized the project, I can add a web worker role. This is done by another PowerShell cmdlet: Add-AzureNodeWebRole.
This will update the Service Configuration files (and convert them back to UTF-16, so don’t save them in Atom after you have created them).
Side bar: It’s important that your server reads the TCP port number from process.env.PORT if it is available. Azure requires this logic. I already built this logic into the server as I developed it.
Step 2: Move the Code into WebRole1
The prior step created a directory WebRole1 with a whole bunch of stuff in it. You need to move all your code into the WebRole1 directory. That includes everything that has been produced thus far.
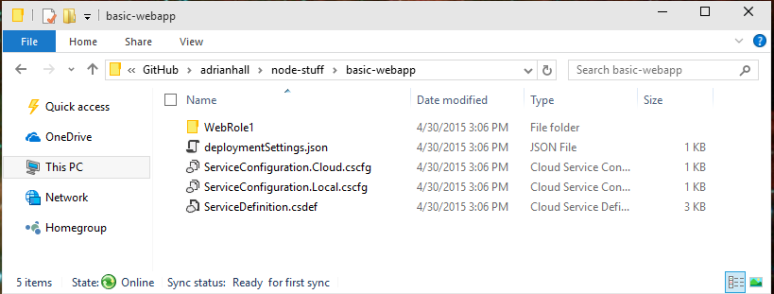
Once you have finished you should have only the four files you created in Step 1, plus the WebRole1 directory at the top level:
Step 3: Adjust URLs to Match Environment
I’m going to deploy my application with the name ShellmongerNodeExample. That means that it will appear as http://shellmongernodeexample.cloudapp.net/ on the web. This URL is located in two places. Firstly, it’s in the config.json file in the “uri” section:
{
  "loginRoute": "/account/login",
  "server": {
    "uri": "http://shellmongernodeexample.cloudapp.net",
    "port": 80
  },
Secondly, it’s in the Auth0 management portal under the callback URL:
You will need to do both changes in order for Social Authentication to work.
Step 4: Deploy the Application to Azure
At this point you will need an Azure subscription. You can sign up for a free trial, use MSDN activated credentials or just activate a pay-as-you-go subscription. Whichever way you do it, you need Azure credentials.
Run Get-AzurePublishSettingsFile. This will bring up a web browser, ask you to log in with your Azure credentials and then finally download a file called something.publishsettings. Store this somewhere secure and whatever you do, don’t check it into GitHub. Consider it an opaque blob that is required to publish stuff to Azure.
To use it, you need to import it:
Import-AzurePublishSettingsFile ~\Downloads\my.publishsettings
Replace the filename with the one you just downloaded.
To publish your Node application to Azure, you can now do the following:
Publish-AzureServiceProject -ServiceName ShellmongerNodeExample -Location "West US" -Launch
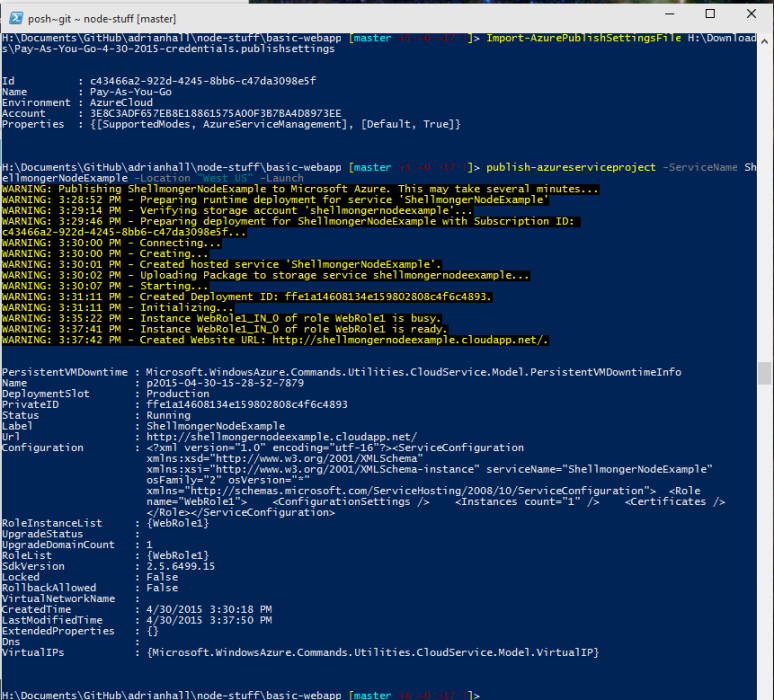
Note that the ServiceName does not need to be the same as your project name. In fact, it’s unlikely that using the same name would work because of conflicts. This process takes a few minutes, but it prints out what it is doing along the way. Here is what mine looked like:
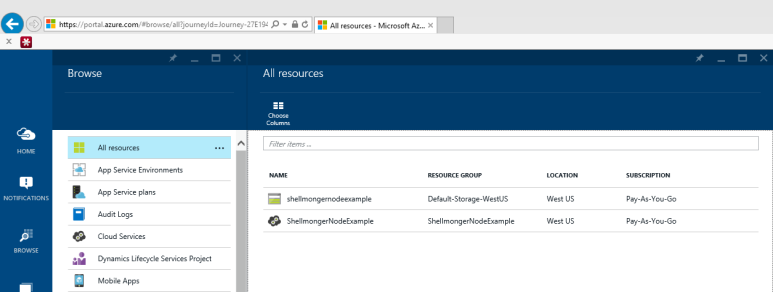
If you browse to portal.azure.com and log in, you will see the application running:
Note that a storage account and a cloud app are created. You can also browse to the app (the Publish activity should have opened a browser window for you). If you’ve done Step 3 properly, you’ll be able to log in via one of the Social connectors and see the home page. You’ll also be able to use Postman to check out the Web API.
Starting and Stopping an Azure Service
I’m a bit fickle about the resources I consume in the cloud. There are two commands you want to know:
- Start-AzureService starts the service
- Stop-AzureService stops the service
Each one takes a -ServiceName parameter – running it in your project directory will start/stop your application. Running these commands outside the project directory requires the -ServiceName parameter.
Deleting the Azure Service
There are two components to the azure service – a cloud app (the service) and a storage account. If you have followed these instructions, the name of the storage account will be the same as the cloud app. However, you may have adjusted it – so these instructions may not work for you, unless you followed the above information.
Firstly, stop your Azure Service with Stop-AzureService. Then you can delete each resource in turn:
Remove-AzureService -ServiceName ShellmongerNodeExample -Verbose
Get-AzureStorageAccount | ? Label -eq "ShellmongerNodeExample" | Remove-AzureStorageAccount
WARNING: There is no going back here – once the storage account is gone, you cannot recreate it to get the data back. You have been warned.
Closing Up
I didn’t get the Azure Emulator to work. This might be because I didn’t create the node application in the “Azure recommended way”, or it may be because I am running Windows 10, or it may be something all together different.
As always, the current source code is on my GitHub Repository.


You must be logged in to post a comment.