
Over the past two articles, I’ve explored using a server-flow and a client-flow technique to authenticate users to Azure AD and accessing information with Azure Mobile Apps. However, there are times I don’t want social authentication – I want users to sign up to my service and deal with registration, forgotten passwords, etc. Maybe I want to link to an existing user database, or maybe I want to use something that Azure Mobile Apps doesn’t support – like Weibo (ok – that’s a stretch since I don’t speak Chinese). What then?
Azure Mobile Apps is a pro-dev solution. Pretty much everything is changeable or optional. In this tutorial, I’m going to set up Auth0 as a source. Last time I looked at Auth0, it was being used as a client-flow where the token was swapped for a zumo token. That only works if the identity provider is supported by Azure Mobile Apps. This time, I’m going to integrate custom authentication which isn’t supported by Azure Mobile Apps. To do this, I’m going to get the service to accept the Auth0 identity token rather than swapping the token for a zumo token.
Start by setting up Auth0
I’m going to configure a brand new application in Auth0. Sign into the Auth0 dashboard (you have an account, right?). Click on Apps / APIs, then on the big New App/API and give it a name. Then click over to the Settings tab for the new application.
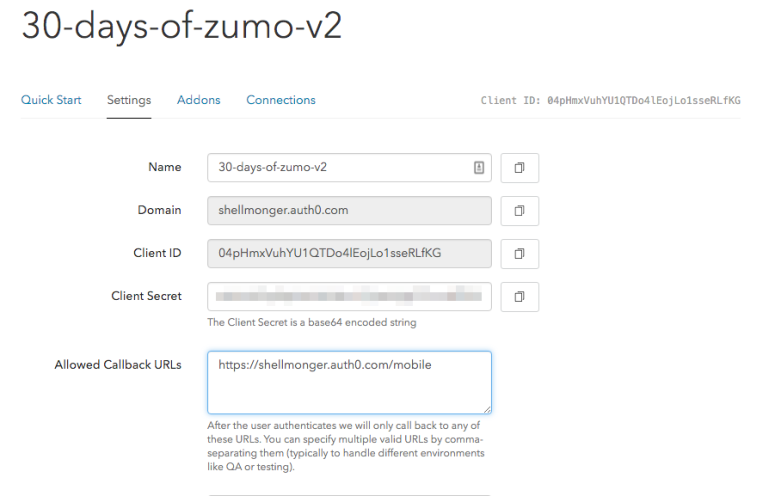
Add the mobile URI (which is the auth0 tenant domain followed by /mobile) to the allowed Callback URIs. Next I can set up the authentication – this can literally be anything that Auth0 supports. However, I want custom authentication. I want to be able to allow users to sign up or sign in without having a social media account. In the sidebar, there is a Connections section – click on that, then select the Database option underneath it. Set up the database to allow sign-ups:
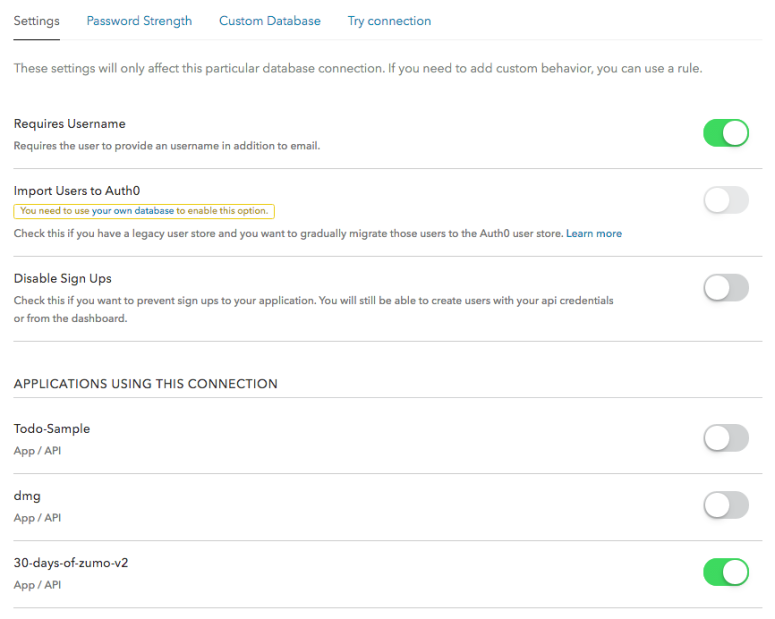
I want to force people to set up a new account, so I removed all the social providers from my application definition in the Connections tab for my application.
Take note of the Auth0 Domain, ClientId and ClientSecret – those will be needed later.
Integrating Auth0 Lock into the Apache Cordova App
I’ve got my Apache Cordova app and I’ve integrated the Auth0 Lock process in plenty of times before – it’s one of my favorite methods to authenticate users. Let’s look at the changes. Most of the changes are in www/js/index.js. First the settings:
    // The ADAL Settings
    //var adal = {
    //    authority: 'https://login.windows.net/common',
    //    resourceUri: 'https://30-days-of-zumo-v2.azurewebsites.net',
    //    redirectUri: 'https://30-days-of-zumo-v2.azurewebsites.net/.auth/login/done',
    //    clientId: 'f35243c4-a4da-4b97-8beb-6a1cf2f76976'
    //};

    var auth0 = {
        clientId: '04pHmxVuhYU1QTDo4lEojLo1sseRLfKG',
        domain: 'shellmonger.auth0.com'
    }
The ADAL code isn’t needed any more, so I’ve just commented it out. The auth0 settings for Client ID and Domain are the only things I need. Don’t specify the client secret. That should never be put in any sort of client code, nor should it ever be checked into a source code repository. It’s, well, secret. Treat it as such.
On to the button logic. I have commented out the entire authenticate() method – it isn’t needed for this functionality. The button handler needs to have the Auth0 lock UI:
        // Set up auth0
        auth0.lock = new Auth0Lock(auth0.clientId, auth0.domain);
        auth0.options = {
            focus: true,
            popup: true,
            rememberLastLogin: true,
            authParams: { scope: 'openid email name' },
        };

        // Wire up the button to initialize the application
        $('#loginButton').on('click', function (event) {
            event.preventDefault();

            auth0.lock.show(auth0.options, function (err, token, profile) {
                console.log(err, token, profile);
            });

            //authenticate(function (data) {
            //    console.log(data);
            //    client.login('aad', { 'access_token': data.accessToken })
            //    .then(initializeApp, function (error) {
            //        console.error(error);
            //        alert('Failed to authenticate to ZUMO!');
            //    });
            //});
        });
As with the ADAL investigation, all I’m doing is logging information at this point – not initializing the application. That comes later.
I will also need to add the Auth0 library to the index.html file. That’s a two step process. Firstly, I need to add the library requirements to the content security policy, and that’s a lot of stuff:
<meta http-equiv="Content-Security-Policy" content="default-src 'self' data: gap: https://30-days-of-zumo-v2.azurewebsites.net; connect-src https://shellmonger.auth0.com https://30-days-of-zumo-v2.azurewebsites.net; script-src https://cdn.auth0.com https://shellmonger.auth0.com 'self'; style-src https://cdn.auth0.com 'self' 'unsafe-inline'; font-src https://cdn.auth0.com data: 'self'; img-src http://cdn.auth0.com https://www.gravatar.com data: 'self'; media-src *">
This is a complex Content Security Policy – let’s break it down:
- default-src ‘self’ data: gap: https://30-days-of-zumo-v2.azurewebsites.net
- connect-src https://shellmonger.auth0.com https://30-days-of-zumo-v2.azurewebsites.net
- script-src https://cdn.auth0.com https://shellmonger.auth0.com ‘self’
- style-src https://cdn.auth0.com ‘self’ ‘unsafe-inline’
- font-src https://cdn.auth0.com data: ‘self’
- img-src http://cdn.auth0.com https://www.gravatar.com data: ‘self’
- media-src *
Most of these entries are for the Auth0 plugin. I wish Auth0 would use external CSS files so I don’t have to use unsafe-inline, but it is what it is. You can find a great source of information on the Content-Security-Policy website. About the only thing they don’t document is gap: (which is for phonegap/cordova APIs).
Secondly, I need to load the Auth0 Lock library:
<script type="text/javascript" src="https://cdn.auth0.com/js/lock-8.2.min.js"></script>
Run this project in the Visual Studio Emulator to see the authentication process in progress. The important thing is the data that is logged on the console though. Note that the lock screen is not hidden afterwards – I’ll get to that next. In the console, I get the following:

the important thing is the token. There are some requirements for using 3rd party tokens with an Azure Mobile App:
- It must follow the Json Web Token format
- The user Id must be in the subject (sub) field
- The audience (aud) and issuer (iss) must be known and configured
Head over to http://jwt.io/ and copy your JWT into the Encoded box. The site will decode the JWT for you. Here is mine:
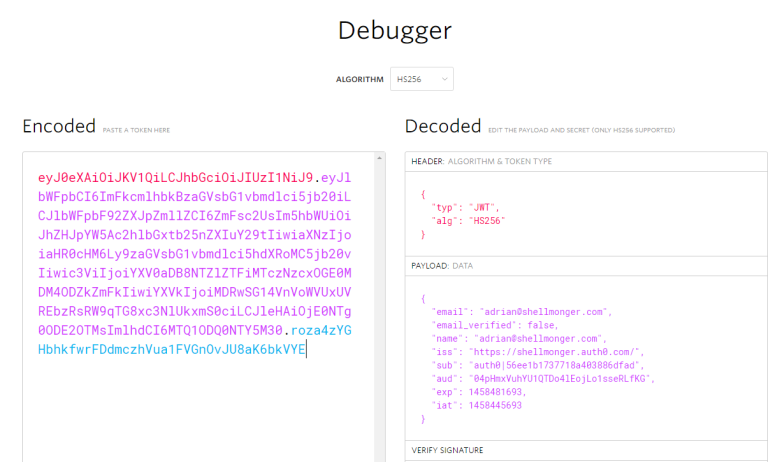
Note that I have a sub field, and the audience and issuer are my Auth0 client Id and domain respectively. Let’s finish off the code on Apache Cordova first, then go configure the server. Here is my button handler:
        // Wire up the button to initialize the application
        $('#loginButton').on('click', function (event) {
            event.preventDefault();

            auth0.lock.show(auth0.options, function (err, profile, token) {
                auth0.lock.hide();
                if (err) {
                    console.error('Error authenticating with Auth0: ', err);
                    alert(err);
                } else {
                    client.currentUser = {
                        id: profile.user_id,
                        profile: profile,
                        mobileServiceAuthenticationToken: token
                    };
                    initializeApp();
                }
            });
As I noted earlier, auth0-lock doesn’t close when it’s finished, so the first thing I do is hide the pop-up. Then I set the ZUMO client.currentUser – the important field here is the mobileServiceAuthenticationToken – this is sent as the X-ZUMO-AUTH string and verified on the server.
Custom JWT Verification in the Server
Now that I have my client in hand, I can work on my server. This is done in two parts. In the Azure Portal, go into your App Service, then All Settings. Go into the Authentication / Authorization blade and turn on the App Service Authentication / Authorization. You don’t need to have any configured services, but the service needs to be turned on. Then go back to All Settings and go to Application Settings. Scroll down to the App Settings section. You need to add an App Setting called Website_Auth_Signing_Key. It is set to the client secret from Auth0.
Note that when you turn off App Service Authentication / Authorization, that isn’t the same as deconfiguration. You can turn it on later and get exactly the same configuration.

Click on Save before leaving the blade. Now, let’s revisit the server code. I need to specify the audience and issuer in the initialization of the azure-mobile-apps SDK:
// Configuration of the Azure Mobile Apps can be done via an object, the
// environment or an auxiliary file.  For more information, see
// http://azure.github.io/azure-mobile-apps-node/global.html#configuration
var mobileApp = azureMobileApps({
    // Explicitly enable the Azure Mobile Apps home page
    homePage: true,
    // Explicitly enable swagger support. UI support is enabled by
    // installing the swagger-ui npm module.
    swagger: true,
    // Authentication settings for custom auth
    auth: {
        audience: '04pHmxVuhYU1QTDo4lEojLo1sseRLfKG',
        issuer: 'https://shellmonger.auth0.com'
    }
});
The audience and issuer must match exactly (including case) what is in the JWT when decoded.
Verifying that the X-ZUMO-AUTH token is working
Since the Authentication / Authorization service is no longer enforcing the X-ZUMO-AUTH token validity, there won’t be any logging to show a bad token. Instead, I need to add some code to log the decoded user during a request. The best place for that is in tables/TodoItem.js – the table controller for the table I am using. Here is my new table controller:
var azureMobileApps = require('azure-mobile-apps');

// Create a new table definition
var table = azureMobileApps.table();

table.read(function (context) {
    console.log('user = ', context.user);
    return context.execute();
});

module.exports = table;
This is a sneak preview for the next article. All I do is log the user object from the passed-in context. If you’ve followed my articles thus far, you will want to check this code into the master branch and then merge it into the azure branch to deploy it:
git add app.js
git add tables/TodoItem.js
git commit -m "Logging for authentication"
git checkout azure
git merge master
git push
Once you hit the final Enter key, the site will re-deploy. While the service is re-deploying, log onto the Azure Portal and select your App Service, then All Settings, then Diagnostic Logs. You want to turn everything on so you can see what is going on. The blade settings should look like this:
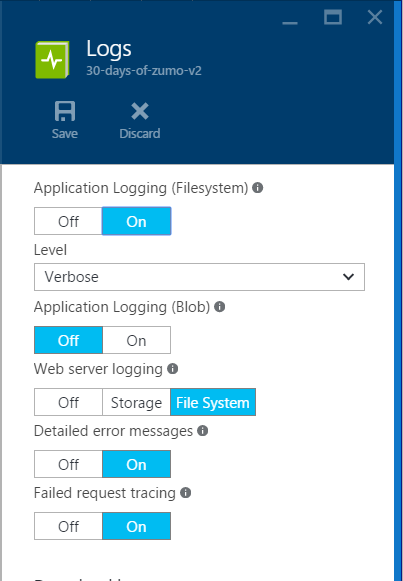
Click on Save, then close the blades for the App Service until you are back at the App Service main blade. Now click on Tools and then Log Stream to see the flow of logs that was just enabled. When the cliet logs in, you should see something similar to this:
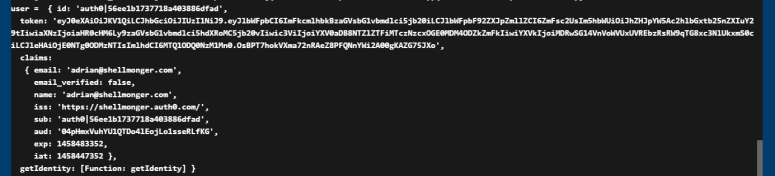
This is all the information from the JWT that Auth0 passed in.
One final note
You will note that there is a getIdentity() method on the context.auth – it’s really tempting to use it, but that’s for getting additional information on the Azure App Service Authentication / Authorization users. It won’t work when using custom authentication and it’s likely that your server will return a 500 error if you do use it.
Next Steps
I’ve taken the smallest of peeks into the Node.js table controller today – just enough so I can take a look at the authentication response. I’ll use that next time to turn this application into a multi-user application.
Before next time, I’m going to switch everything back to ADAL authentication with a client auth. That will be the standard authentication scheme going forward. Then, next time I’ll be taking a look at the things we can do with the table controller.
Until then, the code is up on my GitHub Repository.

You must be logged in to post a comment.